-
Any Questions teco.beautome@gmail.com
最后更新:
The Complete Guide to AI Nail Lamps for Beauty Brands and Distributors
A practical B2B guide to camera-guided nail recognition, targeted UV/LED illumination, sample testing, compliance documentation and AI nail lamp sourcing.
 ByTeco
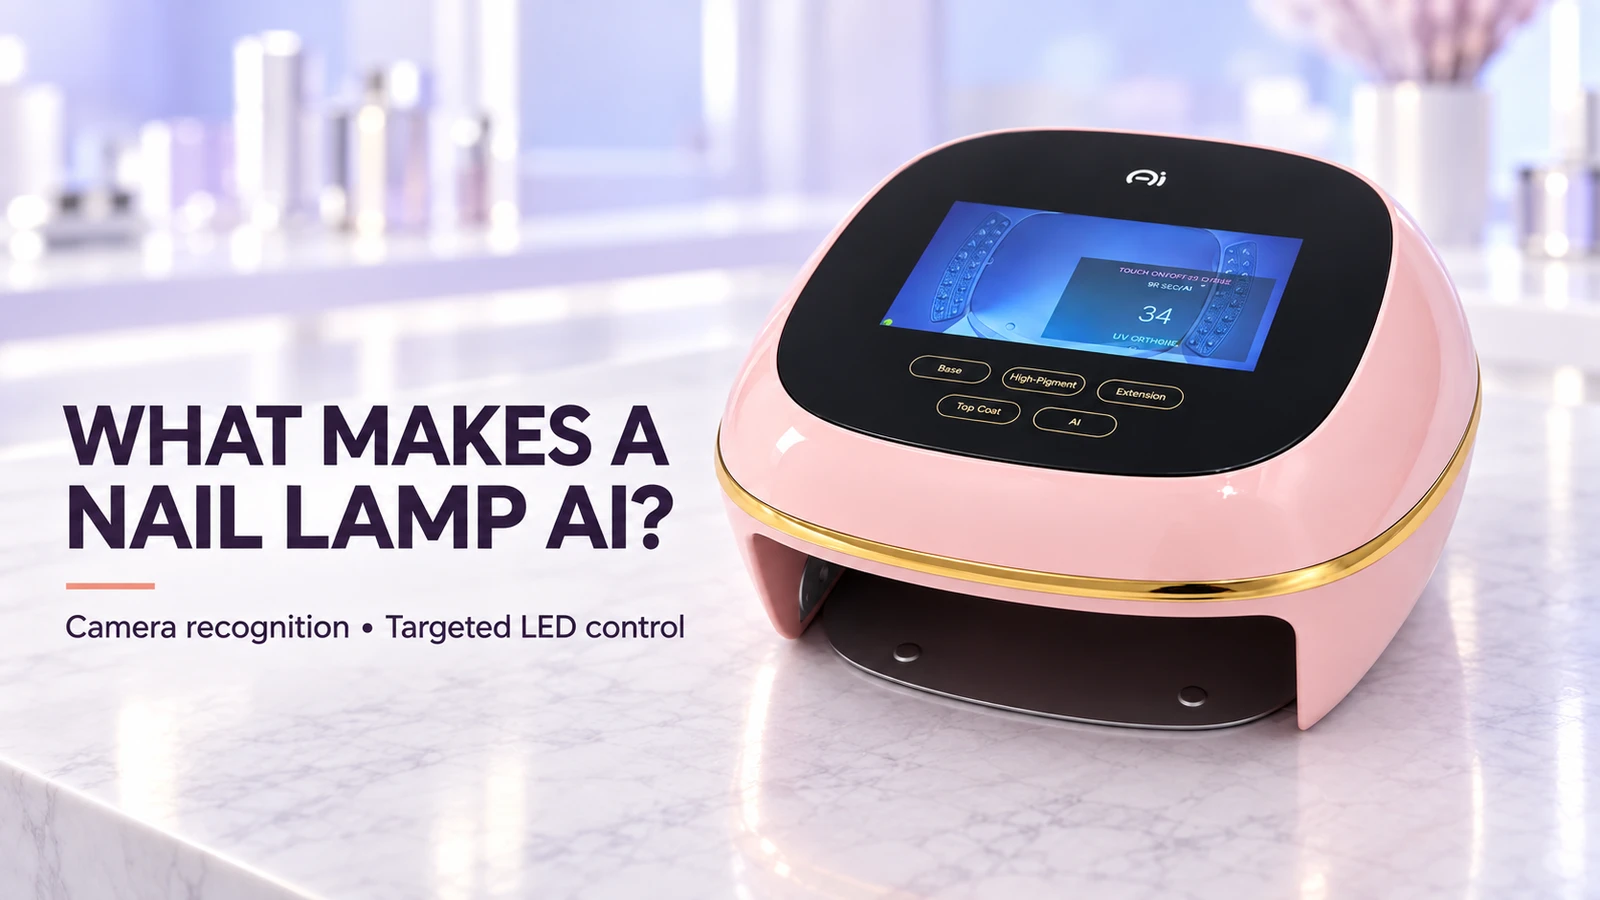
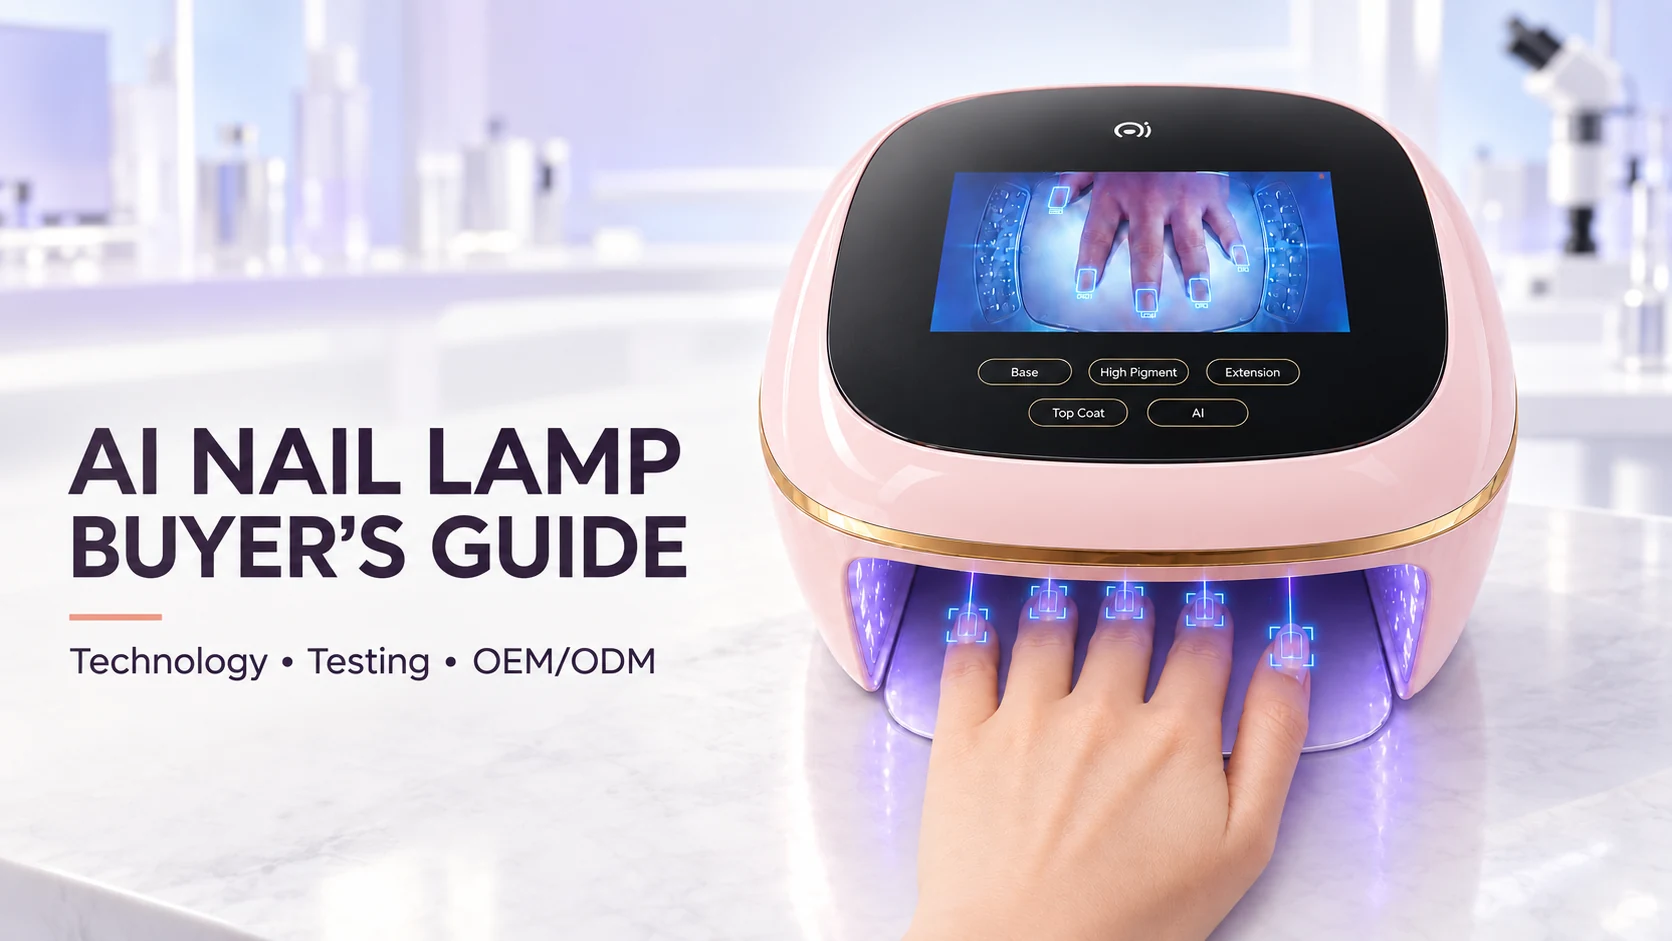
An AI nail lamp is not simply a conventional UV/LED lamp with a screen. Its defining workflow is camera-guided, position-specific illumination: a high-definition camera detects when the hand enters the curing area and triggers the system, an AI algorithm identifies where the nails are located, and the controller activates the UV/LED lights assigned to those nail positions. Instead of illuminating the entire hand with every LED, the system concentrates its primary curing light on the detected nail areas. For a beauty brand or distributor, that changes the buying decision: the product must be evaluated as an integrated vision, computing and optical-control platform, not by wattage or LED count alone.
This guide explains how AI nail lamps work, what specifications matter, how to test a sample, which compliance documents to request and when the additional complexity can support a stronger product position.
What Is an AI Nail Lamp?
An AI nail lamp is a UV/LED gel-curing device that uses a high-definition camera to detect the hand entering the curing area and automatically start the recognition workflow. The AI algorithm then locates the nails within the captured image. The detected positions are mapped to corresponding UV/LED zones, and the controller activates the lights required for those nail areas. This directs the main curing illumination toward the manicure instead of operating the full LED array across the entire hand.
In the BeauTome architecture described here, the camera performs both entry detection and image capture. It initiates the workflow when it detects the hand in the curing area; no infrared trigger is used for this function. The AI algorithm determines nail position, and the UV/LED control system executes the targeted illumination.
The term “AI” should describe a verifiable function. A buyer should be able to see what the camera detects, how the device responds and what happens when detection is imperfect. A camera, voice prompt or display by itself does not prove intelligent curing.
AI nail lamp vs smart sensor nail lamp
| Feature | Basic sensor lamp | AI nail lamp |
|---|---|---|
| Automatic start | Usually triggered by an infrared proximity sensor | The HD camera detects the hand in the curing area and starts the AI workflow |
| Curing control | Fixed timer and broad LED-array illumination | Position-specific activation of the UV/LED zones corresponding to detected nails |
| User interface | Buttons or a small numerical display | Touchscreen, visual guidance and multilingual interface |
| Product development | Mainly electrical, optical and mechanical | Electrical, optical, mechanical, software, interface and algorithm validation |
| Buyer validation | Timer, irradiance, temperature and durability | All conventional tests plus detection, software, language and update testing |
How UV/LED Gel Curing Works
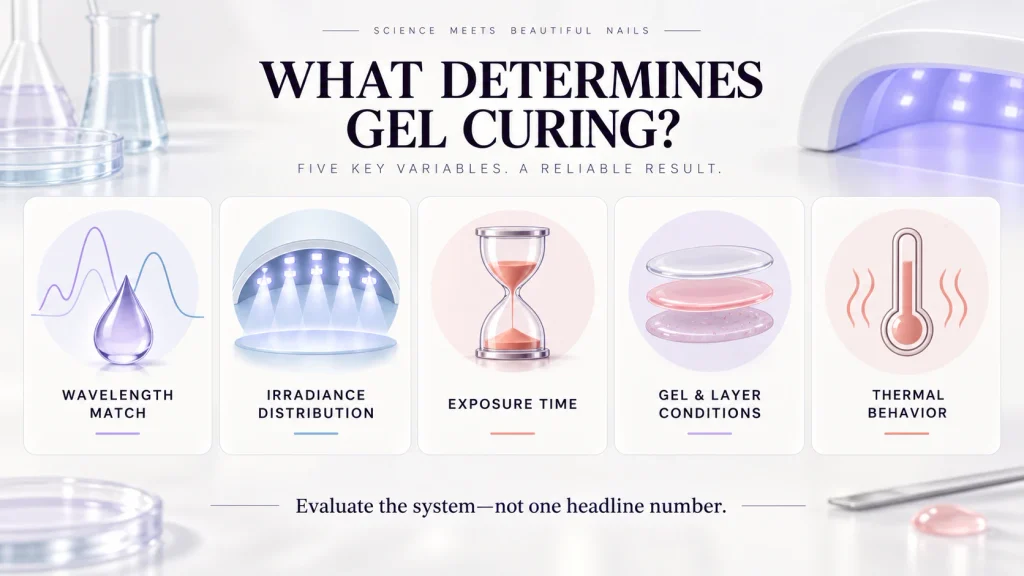
Gel curing is a photochemical process. Light from the lamp activates photoinitiators in a compatible gel formulation, starting polymerization. The result depends on the relationship between the gel chemistry and the lamp’s optical output—not on one headline specification.
Five variables matter together:
- Wavelength range: The emitted spectrum must overlap with the absorption needs of the gel’s photoinitiator system.
- Irradiance distribution: Light needs to reach the center, sides and tips of the nails with useful uniformity.
- Exposure time: A suitable dose depends on both irradiance and time.
- Application conditions: Gel type, color, pigmentation and layer thickness can change curing behavior.
- Thermal behavior: Polymerization and LED operation can generate heat, so the power curve and heat dissipation affect comfort and consistency.
This is why “more watts,” “more LEDs” or “higher intensity” cannot independently guarantee a better cure. A high-pigment color, builder gel and top coat may require different settings. Compatibility testing with the brand’s actual gel system is more meaningful than a generic curing claim.
What Makes the System Intelligent?
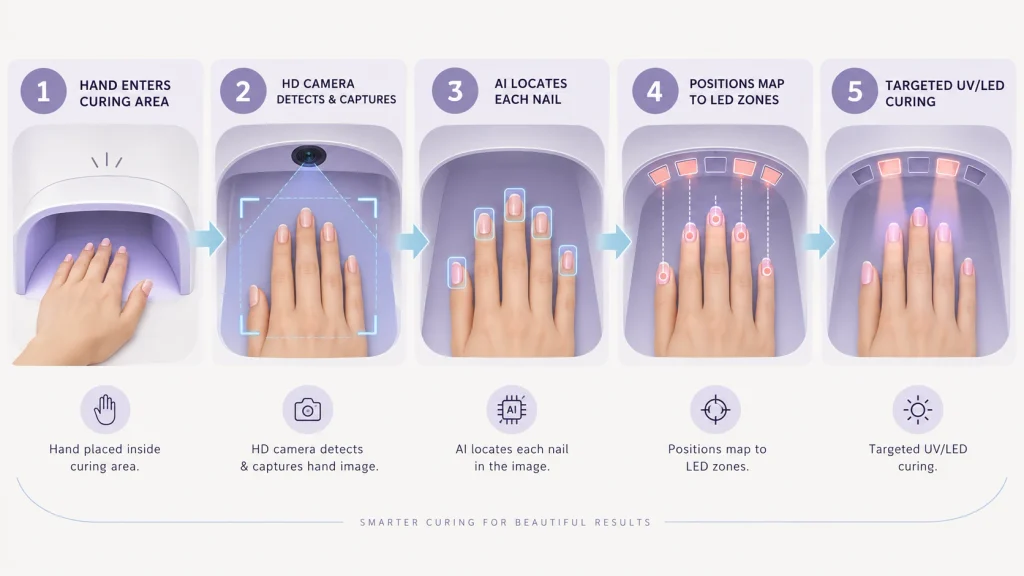
1. The high-definition camera detects entry and starts the workflow
A high-definition camera monitors the curing area. When it captures the hand entering that area, the system starts automatically and supplies the hand image to the AI algorithm. Camera resolution is only the starting point: image clarity, field of view, camera angle, internal reflections and supplemental illumination can all affect entry detection and the image supplied for nail recognition.
2. The AI algorithm locates the nails
The algorithm analyzes the captured image and determines the position of each visible nail. The value lies in whether this complete vision pipeline works across realistic hand positions, skin tones, nail shapes, reflections and salon lighting.
Buyers should test centered and off-center placement, thumbs at different angles, partial insertion, fingers close together and repeated entry and removal. If the camera lens is blocked or dirty, the system should behave predictably and the instructions should explain how to restore normal operation.
3. Local processing maps nail positions to LED zones
On-device computing allows recognition and control logic to run inside the lamp. Once the nail positions are identified, the system maps their coordinates to the corresponding UV/LED zones. This can reduce dependence on a remote cloud service during normal curing, although Wi-Fi may still be used for software updates or other functions. Ask the supplier which functions work offline, what information is stored and how software versions are controlled.
Computing performance measured in TOPS is an architecture specification, not a direct measure of curing quality. It needs to be considered alongside the recognition model, camera pipeline, response time, nail-position accuracy and LED-control behavior.
4. The corresponding UV/LED zones illuminate the manicure
Individually addressable or grouped UV/LED zones are activated according to the detected nail positions. The purpose is to concentrate the primary curing illumination on the manicure while avoiding unnecessary full-array illumination over the rest of the hand.
This is targeted illumination, but it should not be described as absolute zero exposure outside the nails unless optical testing supports that statement. Reflected and scattered light may still reach adjacent skin. Any quantified exposure-reduction claim therefore requires a defined measurement method and test report.
The engineering questions are whether nail-to-LED mapping is accurate, whether every nail receives adequate coverage, what the system does when recognition is uncertain, and whether repeated cycles produce stable results.
5. Curing and heat-control logic manage the exposure cycle
A controlled power curve can ramp or modulate output to manage the heat sensation associated with gel curing. This should be treated as a testable operating feature, not a universal promise of pain-free curing. Gel chemistry, layer thickness and individual sensitivity still influence the experience.
The Specifications Buyers Should Compare
1. Optical system
Request the LED wavelength bands, LED map and irradiance-distribution data rather than relying on a single peak-power number. For a dual-wavelength lamp, confirm both spectral ranges and verify that the intended gel portfolio has been tested under representative conditions.
2. Coverage geometry
The enclosure, reflective surfaces, hand rest and LED placement determine how light reaches the thumb, sidewalls and free edge. Inspect coverage with different hand sizes and natural placement—not only with a hand held in an ideal demonstration pose.
3. Detection performance
Ask how nail recognition is defined and tested. Useful sample metrics include detection time, successful detection rate across a defined test set, response to occlusion and fallback behavior. A claimed response time should be supported by a repeatable test method.
4. Display and localization
A multilingual touchscreen can help one hardware platform serve several markets. It also adds a quality-control requirement. Review terminology, line wrapping, warnings, icons, timer labels and right-to-left or accented characters where relevant. Machine translation should not be the final approval step.
5. Connectivity and updates
If Wi-Fi supports firmware or AI-system updates, define the update process before ordering. Clarify access control, version history, failed-update recovery, end-of-support policy and whether the device remains functional offline.
6. Thermal management and durability
Measure temperatures at the LEDs, PCB, enclosure and user-contact areas during repeated cycles. Evaluate whether performance changes during a busy salon schedule. LED lifetime is influenced by drive current, heat and operating cycles, so any life-extension multiplier requires supporting test conditions.
7. Power architecture
Confirm the adapter input range, DC output, connector, plug, cable, labeling and target-market requirements. If an optional battery is offered, treat it as a separate configuration requiring battery, transport, charging and lifecycle documentation.
2026 BeauTome AI Smart Nail Lamp V2: Current Platform Snapshot
The current BeauTome platform provides a concrete example of an AI nail lamp architecture. The following values come from the 2026 product specification and should be reconfirmed in the approved order specification for each OEM/ODM project.
| Item | Current 2026 specification |
|---|---|
| Operating system | Embedded Linux |
| Processor | 1.2 GHz CPU |
| AI computing | 0.5 TOPS local computing |
| Camera | 2 MP, 1080p |
| Recognition | Nail-area recognition; 0.2-second response listed in the specification |
| LED system | 136 dual-wavelength LED beads |
| Wavelengths | 365–370 nm and 395–400 nm |
| Display | 5.5-inch touchscreen, 1280 × 720 |
| Interface | 29 languages |
| Connectivity | 2.4 GHz and 5 GHz Wi-Fi |
| Dimensions | 24 × 24 × 11.5 cm |
| Weight | 1.85 kg listed in the current specification |
| Battery | Optional 6000 mAh configuration |
These figures describe the platform; they are not substitutes for gel-compatibility data, optical measurements, reliability testing or market-specific compliance review. Explore the BeauTome AI Smart Nail Lamp V2 for the current product overview.
How to Test an AI Nail Lamp Sample
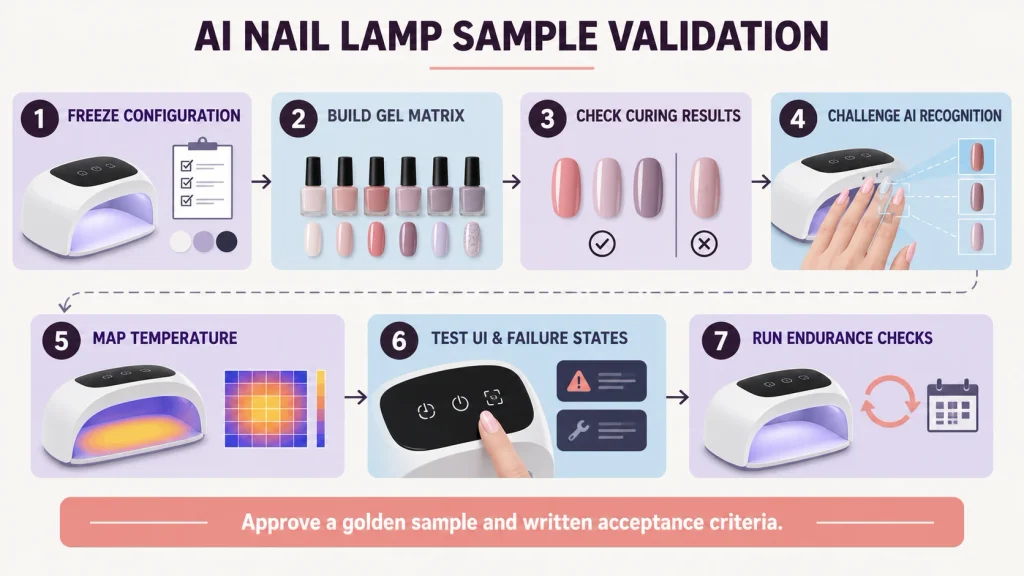
A useful sample review should reproduce real customer use and generate records that can be compared between suppliers.
Step 1: Freeze the sample configuration
Record the model number, hardware revision, firmware version, adapter, LED specification, interface language and included accessories. Photograph the label and retain the sample identification throughout testing.
Step 2: Build a representative gel matrix
Include the brand’s intended base coat, several color gels, a dark or high-pigment shade, builder or extension gel and top coat. Define layer thickness, application method and cure time before testing.
Step 3: Evaluate curing results
Use a documented method appropriate to the gel system. Record surface condition, hardness or adhesion test method, underside cure where relevant, gloss, shrinkage and any visible discoloration. Do not rely solely on whether the surface feels dry.
Step 4: Challenge the recognition system
Test multiple hand sizes, skin tones, nail lengths and placements. Repeat trials under bright, dim and mixed lighting. Record false activations, missed nails, response time and recovery after repositioning.
Step 5: Map temperature behavior
Run repeated curing cycles and log gel-surface sensation separately from device temperature. Compare standard and heat-control modes using the same gel and layer conditions.
Step 6: Test interface and failure states
Review every required language, timer, prompt and warning. Disconnect Wi-Fi, interrupt power, obscure the camera and simulate a failed update if the supplier provides a safe test procedure. The product should fail predictably and recover without confusing the user.
Step 7: Run endurance and consistency checks
Repeat cycles across more than one unit. Track start-up, detection, LED operation, screen response, fan or thermal behavior if applicable, and visible degradation. One attractive golden sample does not establish production consistency.
Compliance and Documentation: What Buyers Should Request
Compliance depends on the product configuration and destination market. A logo printed on a quotation or product image is not enough.
For the European Economic Area, the manufacturer is responsible for identifying applicable legislation, conducting conformity assessment, preparing technical documentation, issuing an EU Declaration of Conformity and affixing CE marking where required. Importers and distributors also have responsibilities. The European Commission explicitly notes that CE marking is a manufacturer’s declaration of conformity—not an approval issued by the EU.
A documentation request may include:
- Product-specific test reports that match the ordered hardware and adapter
- Declaration of Conformity with the correct model identification
- Electrical safety and electromagnetic-compatibility evidence applicable to the configuration
- RoHS material-compliance documentation for the EU market
- Radio-equipment documentation when Wi-Fi is included and applicable
- Optical-radiation risk assessment and user warnings
- Critical-component list and traceability records
- Label artwork, rated input, manufacturer/importer details and localized instructions
- Battery safety and transport documents for battery-equipped versions
- Quality-control plan, golden sample and change-control procedure
Do not assume the same document set applies to every country. Confirm the classification and applicable rules with a qualified compliance professional for the intended market.
OEM/ODM Decisions to Make Before Quotation
An AI nail lamp can offer more meaningful customization than a conventional shell-color project, but each option adds validation work.
| Customization area | Buyer decision | Validation implication |
|---|---|---|
| Exterior | Color, finish, logo, packaging | Appearance approval, coating durability and label review |
| User interface | Brand assets, languages, mode names | Translation, layout and workflow testing |
| Curing modes | Timing and power curves | Gel-specific performance and thermal validation |
| LED control | Zone map and fallback logic | Coverage and recognition challenge tests |
| Software | Start-up screen, update policy, version | Version control, recovery and after-sales ownership |
| Accessories | Adapter, cable, optional battery | Market compliance, packaging and transport documents |
Before tooling or mass production, use a written product requirement document. Define what is fixed, what is customizable, who approves software changes and which test results constitute acceptance.
How to Evaluate a Manufacturer
The right supplier needs more than assembly capacity. Ask for evidence across six areas:
- Optical engineering: LED selection, layout, wavelength verification and irradiance mapping.
- Vision and software: Recognition demo, version control, language management and update support.
- Electrical engineering: PCB design, adapter integration, EMC preparation and component control.
- Mechanical and thermal engineering: enclosure design, heat paths, reflective surfaces and coating durability.
- Manufacturing quality: incoming inspection, in-process tests, aging tests, calibration or functional checks and traceability.
- Commercial support: clear specification control, sample feedback, packaging development and after-sales responsibility.
Ask the supplier to demonstrate the process with records. A factory tour or promotional video may show equipment, but it does not replace product-specific test evidence.
Total Cost of Ownership for Brands and Distributors
The factory unit price is only one layer of the business case. Model the following costs:
- Hardware, adapter, packaging and optional battery
- Industrial-design, tooling and surface-finish changes
- UI branding, translation and firmware customization
- Product testing and market documentation
- Sample approval and pre-production validation
- Freight, duty and local labeling
- Training, demonstration content and customer support
- Warranty reserve, replacement units and software maintenance
An AI nail lamp can justify a premium position when the guided workflow is visible, useful and supportable. It is a weaker choice when the brand cannot explain the difference, validate its gel portfolio or maintain the software experience. For a direct architecture and value comparison, read AI Nail Lamp vs Traditional Nail Lamp: Understanding the Real Cost and Value.
AI Nail Lamp Buyer Checklist
Before approving a supplier or purchase order, confirm:
- The AI function has been demonstrated with defined test conditions.
- The wavelength bands and LED map match the approved specification.
- Your actual gel matrix has passed a documented curing evaluation.
- Temperature behavior has been checked during repeated cycles.
- Required interface languages have received human review.
- Offline behavior and software-update recovery are understood.
- The adapter, Wi-Fi and optional battery configurations are clearly identified.
- Test reports and declarations match the exact model and components.
- Labels, instructions and warnings fit the destination market.
- A golden sample, firmware version and acceptance criteria are signed off.
- Change notification and after-sales responsibilities are written into the project.
Frequently Asked Questions
Does an AI nail lamp cure gel faster?
Not automatically. Curing speed depends on gel chemistry, wavelength compatibility, irradiance, exposure and layer conditions. AI may coordinate the workflow or LED zones, but the result needs product-specific testing.
Is a higher LED count always better?
No. LED placement, optical distribution, drive conditions, thermal management and gel compatibility matter more than count alone. Compare the complete light field and test results.
Does the BeauTome AI nail lamp use an infrared sensor to start?
No. In the current BeauTome AI workflow, the high-definition camera detects that the hand has entered the curing area and starts the system. The same camera supplies the image used by the AI algorithm to locate the nails and activate the corresponding UV/LED zones. Conventional lamps often use an infrared sensor for automatic start, but that is not the trigger mechanism described for this AI platform.
Does TOPS measure curing performance?
No. TOPS describes theoretical AI-computing throughput. It does not measure optical output, curing quality or recognition accuracy. Ask how the processor supports a demonstrated function.
Do dual wavelengths make a lamp compatible with every gel?
No. Broader spectral coverage can support more photoinitiator systems, but universal compatibility should not be assumed. Test each intended gel family and shade.
Can an AI nail lamp work without Wi-Fi?
That depends on its architecture. The BeauTome platform uses local computing for the AI workflow, while Wi-Fi supports system connectivity and updates. Buyers should confirm which functions remain available offline for the approved software version.
What should distributors check before importing?
Verify the exact model, market classification, applicable legislation, declarations, product-specific test reports, labeling, instructions, adapter and radio or battery documentation. Importer obligations vary by market.
Can the interface be private-labeled?
Potentially, yes. Logo, start-up screen, colors, languages and workflows may be customizable, but the scope and ownership should be agreed before quotation and revalidated after changes.
What is the most important sample test?
There is no single test. The minimum useful program combines gel compatibility, optical coverage, recognition challenges, temperature behavior, endurance, interface review and failure-state testing.
Who should choose an AI nail lamp?
It best fits brands, distributors and salon-focused product lines that want a differentiated flagship experience and can support deeper validation, training and after-sales service.
Build the Specification Before You Build the Product
The strongest AI nail lamp project begins with a defined use case: target customer, gel system, markets, interface languages, desired workflow and acceptance tests. Once those decisions are clear, the camera, processor, LED system and software can be evaluated as one platform.
To review the current platform, visit the BeauTome AI Smart Nail Lamp V2. If you are planning a private-label or OEM/ODM program, contact BeauTome with your target markets, gel portfolio, language requirements and launch schedule to request a configuration and sample-validation discussion.
Sources and Evidence Notes
- BeauTome, AI SMART NAIL LAMP 2026.xlsx, current internal product specification reviewed September 2026.
- BeauTome, AI Nail Lamp V2 user manual, used only as an operational and safety reference; current product values come exclusively from the 2026 specification.
- European Commission: CE marking
- EUR-Lex: Low Voltage Directive 2014/35/EU
- EUR-Lex: Electromagnetic Compatibility Directive 2014/30/EU
- U.S. FDA: Ultraviolet (UV) Radiation
Updated: September 2026. Product specifications and regulatory requirements can change. Confirm the approved order specification and destination-market requirements before launch.